 This hummus testing journey started for a few reasons.
A. I live with a hummus monster*.
*small human that goes through multiple containers of store bought hummus per week.
B. The aforementioned hummus monster was incredibly generous this past mothers day and bought her momma a Vitamix. (!!!! I know!!!!)
C. I love the convenience and great taste of my favourite store bought hummus but hate spending a small fortune on it.
So I made a commitment to create THE best homemade hummus. For you!
(but mostly for me)
Over the years I’ve made a lot hummus. I’ve scoured the interweb for ‘the best’ recipes and have picked up tips along the way that work and others that don’t.
This is a culmination of all of that and a few new variables I’ve been wanting to test.
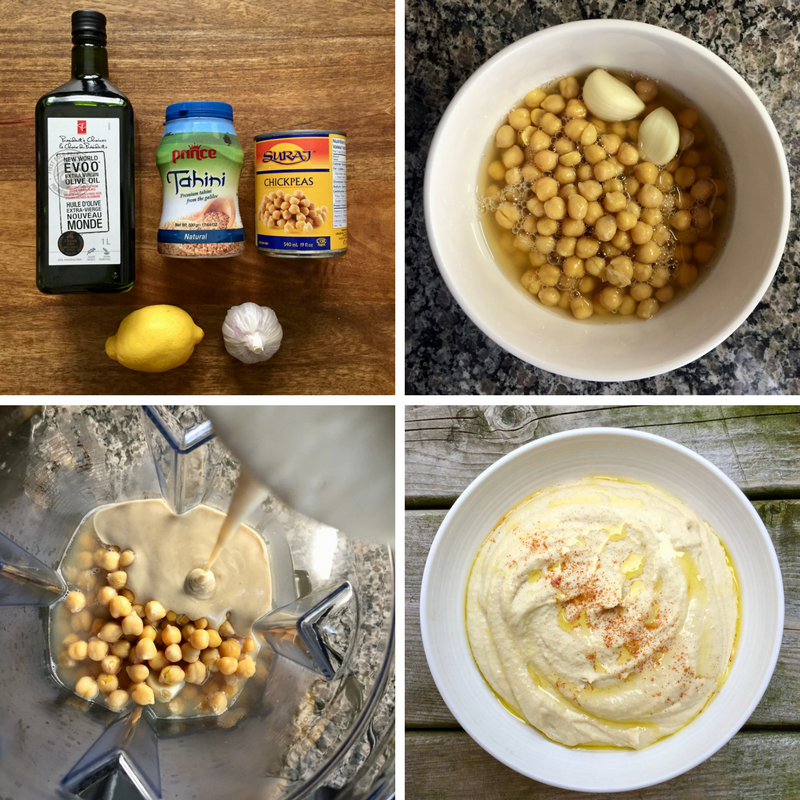
I’ve used only the classic ingredients for this recipe and I tested it in both my fancy new blender and my 15 year old food processor which is totally still up for the task.
The Results
First result: the Vitamix makes really really really really smooth hummus, guys. Like, so smooth. But my trusty old food processor is no slouch and I can confidently say, a food processor does a beautiful job.
My next test was trying ‘the microwave method’ popularized by The Minimalist Baker. Her recipes calls for microwaving the canned chickpeas in their brine along with whole cloves of garlic for 5 minutes before blending.
THIS IS A GAME CHANGER.
While Dana claims this makes the hummus extra creamy and garlicky, I found it didn’t change the texture much (which I attribute to the 1/2 cup of tahini and using the brine) but the garlic, for me, was WAY toned down. One of the reasons I don’t love homemade hummus is the sharp raw garlic flavour. I’ve roasted garlic for hummus before, and it’s a great way to settle the garlic flavour down, too. But it also takes an hour.
Now in terms of ingredients, I tried a couple of new things.
One, I tested a batch with no salt added chickpeas. It was fine. I just needed to add lots of salt, so…..
Two, I tested varying amounts of tahini. Many blog posts and recipes I reviewed for good hummus insist on good quality tahini, and lots of it. I don’t know if I’ve ever had ‘good quality’ tahini. I buy one of the 3 brands available at my grocery store and they all seem pretty similar. Sticky, a little bit bitter and not too tasty on their own, but killer as an ingredient in many a sauce and spread. This recipe uses a whopping 1/2 cup of tahini. Don’t skimp, people.
It’s all about the Benjamins
Now, with all that tahini how on earth did I save any money?!
Lemme break it down.
My fave store brand hummus costs $3.57 for 283g (this is the least expensive regular price I could find). That’s $0.13 per gram.
One batch of my homemade hummus (priced out based on regular price everything and decent quality olive oil) costs $3.89 for 679g. $0.06 per gram. Less than half! Ka-ching!
With lots of hummus testing, comes lots of hummus. As in, I’m up to my eyeballs in hummus. So as one final experiment, I froze a batch to test whether the quality changes.
Another win! If there was a change in texture or flavour after a couple of nights in the freezer, I couldn’t tell at all.
One batch fits just about perfectly in a sandwich-sized zipper bag. I doubled up on the sandwich bag to create a good barrier, labelled them with the date and popped the extra batches into the freezer for later.
Man, I’m feeling like a Pinterest mom right now.
Now, I only have to make hummus about 200 times to make that Vitamix a fiscally responsible choice.
Erin
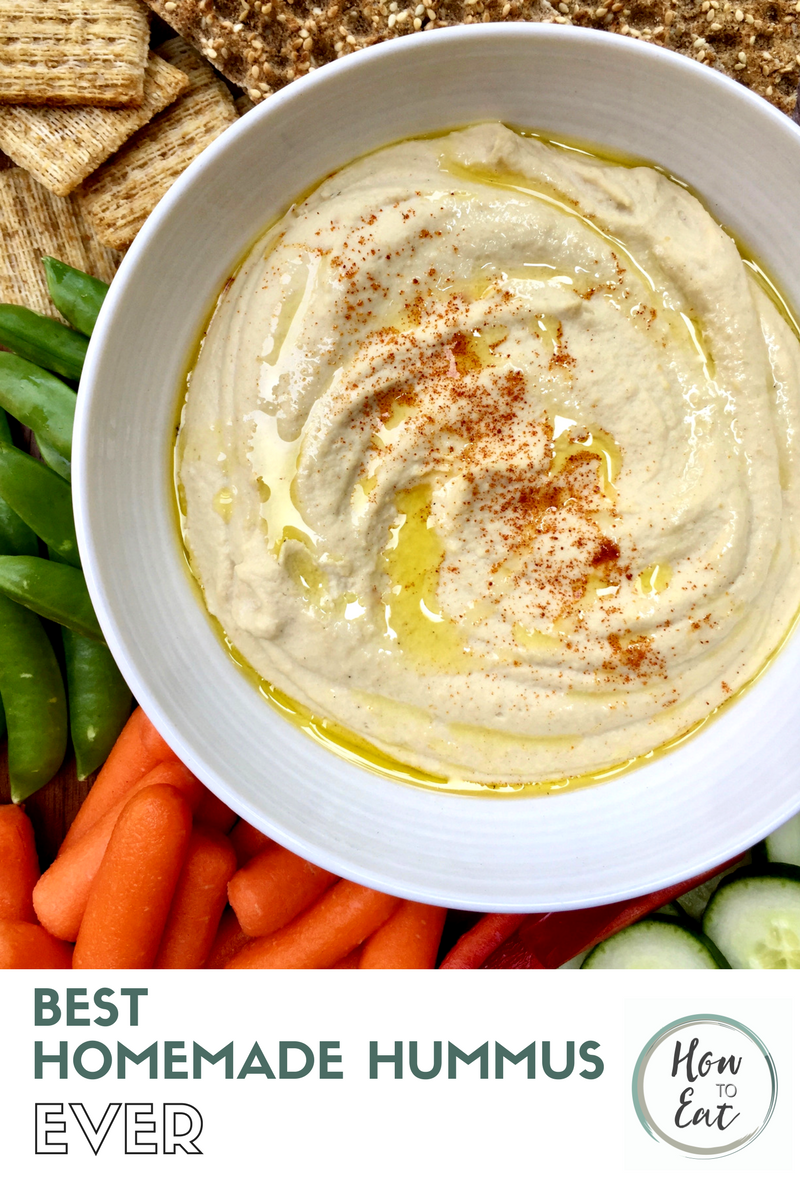
Best Homemade Hummus Ever
 Print recipe
| Serves | makes about 3 cups |
| Prep time | 5 minutes |
| Cook time | 5 minutes |
| Total time | 10 minutes |
| Website | Adapted from the Minimalist Baker Microwave Hummus |
Ingredients
- 1 19 oz. / 540mL can of chickpeas
- 3 Large cloves garlic
- 1/2 cup tahini
- 4 tablespoons fresh lemon juice (the juice of about 1 medium lemon)
- 3 tablespoons extra virgin olive oil (plus extra for drizzling)
- 1/2 teaspoon salt
Directions
| 1. | Into a medium microwave safe bowl, add chickpeas along with their brine and garlic cloves. Microwave on high for 5 minutes. Allow to cool slightly. |
| 2. | Combine chickpeas, garlic and remaining ingredients in a food processor or blender and blend until smooth. Allow to cool in the fridge before serving. Drizzle additional olive oil overtop, if desired. |


Melanie Huffman says
sounds fab!! do you have any suggestions for sesame oil vs tahini?? (only because that is what I currently have in my cupboard!!)
Erin & Dara says
You could definitely try substituting sesame oil for tahini, although sesame oil is a bit stronger in flavour so maybe start with a little less and taste as you go. If you try this let us know!
Heather says
Ok, so my next testing question is whether you have ever tried pressure cooked chickpeas? I have to say, after pressure cooking my beans, chickpeas, you name it, I have a hard time going back to using canned beans, even in emergencies. The taste and texture are so much better! I’ll have to give this recipe a whirl with my Ninja Pro, and some home cooked chick peas. I’m super curious to see how it will turn out!
Erin & Dara says
Sounds like that would be really fabulous! Let us know how it turns out!
Susan says
Omg… love everything about this. Love the detail. The commitment to the cause! The look of that hummus! And the vitamix will become religion. The amount it’s saved me in nut milks alone has made it ✅!!!!! Enjoy chica! Both you and Dara are excellent writers too!!! That I enjoy reading. #superwoman much?! Keep em coming.
Erin & Dara says
Thank you so much for your kind words Susan. Made our day!!! xoxo